Angular 入门:你的第一个应用
Getting Started with Angular: Your First App
Angular 欢迎你!
Welcome to Angular!
本教程将向你介绍 Angular 的基本知识。它利用你已经知道的 HTML 和 JavaScript 以及一些有用的 Angular 特性来构建一个简单的在线商店应用,它具有商品名录、购物车和结账表单功能。你无需安装任何东西:你将使用 StackBlitz 在线开发环境来构建本应用。
This tutorial introduces you to the essentials of Angular. It leverages what you already know about HTML and JavaScript—plus some useful Angular features—to build a simple online store application, with a catalog, shopping cart, and check-out form. You don't need to install anything: you'll build the app using the StackBlitz online development environment.
你可以找到很多资源作为 Angular 文档的补充。Mozilla 的 MDN 文档同时包含了 HTML 和 JavaScript 的 介绍。TypeScript 的文档中包含一个 5 分钟教程。各种在线课程平台,比如 Udemy 和 Codecademy,也涵盖了 Web 开发的一些基础知识。
You'll find many resources to complement the Angular docs. Mozilla's MDN docs include both HTML and JavaScript introductions. TypeScript's docs include a 5-minute tutorial. Various online course platforms, such as Udemy and Codecademy, also cover web development basics.
创建一个新项目
Create a new project
点此在 StackBlitz 上创建一个新项目
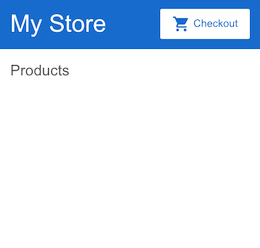
用 StackBlitz 创建一个入门级 Angular 应用。我们已经为这个应用添加了一个包含商店名称和结帐图标的顶栏,以及商品列表的标题。
StackBlitz creates a starter Angular app. We've seeded this particular app with a top bar—containing the store name and checkout icon—and the title for a product list.
登录 StackBlitz,就可以随时保存和恢复你的工作。如果你已经有了 GitHub 账号,也可以用该账号登录 StackBlitz。
Log into StackBlitz, so you can save and resume your work. If you have a GitHub account, you can log into StackBlitz with that account.
要复制本教程中的代码示例,请单击代码示例框右上角的图标,然后将剪贴板中的代码片段粘贴到 StackBlitz 中。
To copy a code example from this tutorial, click the icon at the top right of the code example box, and then paste the code snippet from the clipboard into StackBlitz.
如果 StackBlitz 预览窗格没有如你预期般显示出来,请保存并点击刷新按钮。
If the StackBlitz preview pane isn't showing what you expect, save and then click the refresh button.
StackBlitz 正在不断改进,因此生成的代码可能会略有不同,但应用的行为是一样的。
StackBlitz is continually improving, so there may be slight differences in generated code, but the app's behavior will be the same.
模板语法
Template syntax
Angular 的模板语法扩展了 HTML 和 JavaScript。在本节中,你将通过增强 “商品” 区域来了解模板语法。
Angular's template syntax extends HTML and JavaScript. In this section, you'll learn about template syntax by enhancing the "Products" area.
(为了让你专注于模板语法,下列步骤使用了 product-list.component.ts 文件中预定义的一些商品数据和方法。)
(So that you can focus on the template syntax, the following steps use predefined product data and methods from the product-list.component.ts file.)
在
product-list文件夹中,打开模板文件product-list.component.html。In the
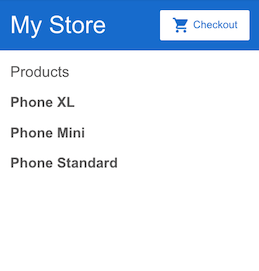
product-listfolder, open the template fileproduct-list.component.html.修改商品列表模板,看是否列出了商品名称。
Modify the product list template to display a list of product names.
我们希望列表中的每个商品能以同样的方式在页面上挨个显示出来。要遍历这些预定义的商品列表,请使用
*ngFor指令。把*ngFor指令加到<div>上,如下图所示:We want each product in the list to be displayed the same way, one after the other on the page. To iterate over the predefined list of products, use the
*ngFordirective. Put the*ngFordirective on a<div>, as shown below:src/app/product-list/product-list.component.html <h2>Products</h2> <div *ngFor="let product of products"> </div>*ngFor会导致<div>被列表中的每个商品都重复渲染一次。*ngForcauses the<div>to be repeated for each product in the list.*ngFor是一个 "结构型指令"。结构型指令会通过添加、删除和操纵它们的宿主元素等方式塑造或重塑 DOM 的结构。任何带有 * 的指令都是结构型指令。*ngForis a "structural directive". Structural directives shape or reshape the DOM's structure, typically by adding, removing, and manipulating the elements to which they are attached. Any directive with an*is a structural directive.要显示商品的名称,请使用插值语法
{{}}。插值会把属性的值作为文本渲染出来。在<div>里面,添加一个<h3>标题来显示商品 name 属性的插值:To display the names of the products, use the interpolation syntax {{ }}. Interpolation renders a property's value as text. Inside the
<div>, add an<h3>heading to display the interpolation of the product's name property:<h2>Products</h2> <div *ngFor="let product of products"> <h3> {{ product.name }} </h3> </div>预览窗格会立即更新,以显示列表中每个商品的名称。
The preview pane immediately updates to display the name of each product in the list.
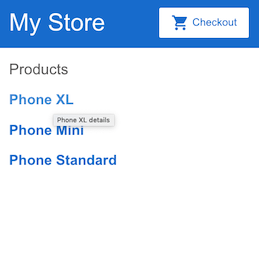
在最终的应用中,每个商品名称都会链接到商品详情。现在添加这个链接,并使用属性绑定语法
[]把该链接的 title 设置成该商品的名字,如下所示:In the final app, each product name will be a link to product details. Add the anchor now, and set the anchor's title to be the product's name by using the property binding [ ] syntax, as shown below:
<h2>Products</h2> <div *ngFor="let product of products"> <h3> <a [title]="product.name + ' details'"> {{ product.name }} </a> </h3> </div>在预览窗格中,将鼠标悬停在显示的商品名称上,可以看到绑定的 name 属性值。它们都是一样的。插值表达式
{{}}允许你把属性值渲染为文本;而属性绑定语法[]则允许你在模板表达式中使用属性值。In the preview pane, hover over the displayed product name to see the bound name property value. They are the same. Interpolation {{ }} lets you render the property value as text; property binding [ ] lets you use the property value in a template expression.
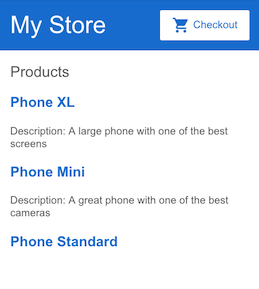
添加商品说明。在 p 标签上,使用
*ngIf指令,这样才能在当前商品有描述信息的情况下创建这个 p 元素。Add the product descriptions. On the paragraph tag, use an
*ngIfdirective so that the paragraph element is only created if the current product has a description.该应用会立即在列表中显示每种商品的名称和描述,如下所示。请注意,最后一个商品根本没有描述信息。由于该商品的 description 属性为空,因此不会创建 p 元素(包括静态文本 “Description”)。
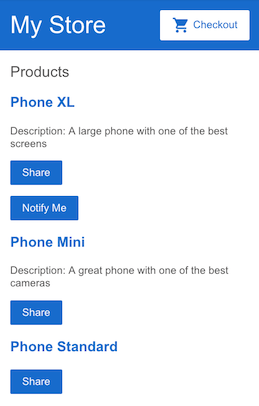
The app now displays the name and description of each product in the list, as shown below. Notice that the final product does not have a description paragraph at all. Because the product's description property is empty, the paragraph element—including the word "Description"—is not created.
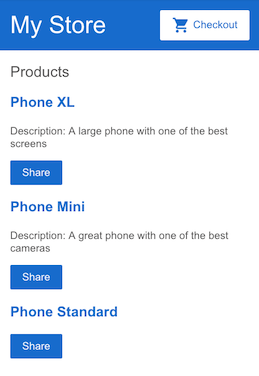
添加一个按钮,以便让用户可与朋友分享商品。把 button 的
click事件绑定到我们替你定义好的share()事件上(位于product-list.component.ts)。事件绑定是通过把事件名称包裹在圆括号()中完成的,如下所示:Add a button so users can share a product with friends. Bind the button's
clickevent to theshare()event that we defined for you (inproduct-list.component.ts). Event binding is done by using ( ) around the event, as shown below:现在,每个商品都有一个 “Share” 按钮了:
Each product now has a "Share" button:
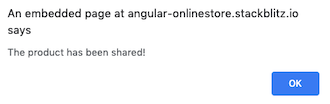
测试 “Share” 按钮:
Test the "Share" button:
该应用现在具有商品列表和共享功能。在这个过程中,你已经学会了 Angular 模板语法的五个常用特性:
The app now has a product list and sharing feature. In the process, you've learned to use five common features of Angular's template syntax:
要了解关于 Angular 模板语法全部特性的信息,请参阅模板语法指南。
Learn more: See the Template Syntax guide for information about the full capabilities of Angular's template syntax.
组件
Components
组件在 UI 中定义了一些责任区,让你能重用这些 UI 功能集。你已经通过商品列表组件构建了一个。
Components define areas of responsibility in your UI that let you reuse these sets of UI functionality. You've already built one with the product list component.
组件包含三部分:
A component is comprised of three things:
一个组件类,它用来处理数据和功能。上一节,我们在组件类中定义了商品数据和
share()方法。A component class, which handles data and functionality. In the previous section, the product data and the
share()method were defined for you in the component class.一个 HTML 模板,它决定了用户的呈现方式。在上一节中,你修改了商品列表的 HTML 模板,以显示每个商品的名称、描述和 “Share” 按钮。
An HTML template, which determines what is presented to the user. In the previous section, you modified the product list's HTML template to display the name, description, and a "Share" button for each product.
组件专属的样式定义了外观和感觉。商品列表中还没有定义任何样式。
Component-specific styles that define the look and feel. The product list does not define any styles.
Angular 应用程序由一棵组件树组成,每个 Angular 组件都有一个明确的用途和责任。
An Angular application is composed of a tree of components, in which each Angular component has a specific purpose and responsibility.
目前,我们的应用有三个组件:
Currently, our app has three components:
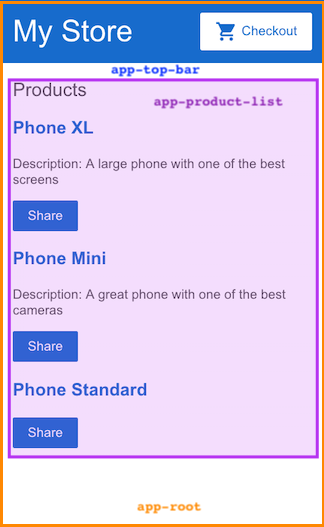
app-root(橙色框)是应用的外壳。这是要加载的第一个组件,也是所有其它组件的父组件。你可以把它想象成一个基础页面。app-root(orange box) is the application shell. This is the first component to load, and the parent of all other components. You can think of it as the base page.app-top-bar(蓝色背景)是商店名称和结帐按钮。app-top-bar(blue background) is the store name and checkout button.app-product-list(紫色框)是你在上一节中修改过的商品列表。app-product-list(purple box) is the product list that you modified in the previous section.
在下一节中,你将通过为商品提醒添加新组件来扩展应用的功能。你可以把它添加为商品列表组件的子组件。
In the next section, you'll expand the app's capabilities by adding a new component for a product alert. You'll add it as a child of the product list component.
要了解关于组件及其与模板交互的更多信息,请参阅“组件简介”。
Learn more: See Introduction to Components for more information about components and how they interact with templates.
输入
Input
目前,商品列表会显示每个商品的名称和描述。你可能已经注意到,商品列表组件还定义了一个 products 属性,它包含每个商品的导入数据。(参见 products.ts 中的 products 数组。)
Currently, the product list displays the name and description of each product. You might have noticed that the product list component also defines a products property that contains imported data for each product. (See the products array in products.ts.)
我们要创建一个新的提醒功能。提醒功能会接收一个商品作为输入。然后它会检查商品的价格,如果价格高于 700 美元,它会显示一个“Notify Me”(通知我)按钮,让用户注册一个当商品上市时发送的通知。
We're going to create a new alert feature. The alert feature will take a product as an input. It will then check the product's price, and, if the price is greater than $700, it will display a "Notify Me" button that lets users sign up for notifications when the product goes on sale.
创建一个新商品提醒组件。
Create a new product alerts component.
右键单击
app文件夹,使用Angular Generator生成一个名为product-alerts的新组件。Right click on the
appfolder and use theAngular Generatorto generate a new component namedproduct-alerts.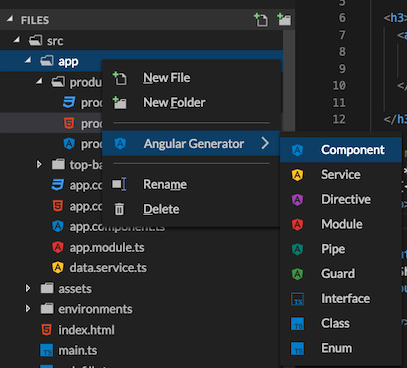
该 generator 为组件的三个部分创建了启动文件:
The generator creates starter files for all three parts of the component:
product-alerts.component.tsproduct-alerts.component.htmlproduct-alerts.component.css
打开
product-alerts.component.ts。Open
product-alerts.component.ts.src/app/product-alerts/product-alerts.component.ts 注意
@Component装饰器。这表明它下面的类是一个组件。它提供了有关该组件的元数据,包括它的模板、样式和选择器。Notice the
@Componentdecorator. This indicates that the following class is a component. It provides metadata about the component, including its templates, styles, and a selector.该
selector用于标识该组件。该选择器是当 Angular 组件在页面中渲染出 HTML 元素时使用的名字。按照惯例,Angular 组件选择器会以前缀app-开头,后跟组件名称。The
selectoris used to identify the component. The selector is the name you give the Angular component when it is rendered as an HTML element on the page. By convention, Angular component selectors begin with the prefixapp-, followed by the component name.模板和样式文件名。它们是对另外两个生成的文件的引用。
The template and style filenames. These reference the other two files generated for you.
组件定义中还包含一个导出类(
ProductAlertsComponent),用于处理该组件的功能。The component definition also includes an exported class (
ProductAlertsComponent), which handles functionality for the component.
设置新商品提醒组件,让它接收一个商品作为输入:
Set up the new product alerts component to receive a product as input:
从
@angular/core导入Input。Import
Inputfrom@angular/core.import { Component, OnInit } from '@angular/core'; import { Input } from '@angular/core';在
ProductAlertsComponent类的定义中,定义一个带@Input装饰器的product属性。@Input装饰器指出其属性值是从组件的父组件(在本例中就是商品列表组件)中传入的。In the
ProductAlertsComponentclass definition, define a property namedproductwith an@Inputdecorator. The@Inputdecorator indicates that the property value will be passed in from the component's parent (in this case, the product list component).export class ProductAlertsComponent implements OnInit { @Input() product; constructor() { } ngOnInit() { } }
定义这个新商品提醒组件的视图。
Define the view for the new product alert component.
打开
product-alerts.component.html模板,把作为占位符的 p 替换为如果商品价格超过 700 美元就要显示出来的“通知我”按钮。Open the
product-alerts.component.htmltemplate and replace the placeholder paragraph with a "Notify Me" button that appears if the product price is over $700.src/app/product-alerts/product-alerts.component.html <p *ngIf="product.price > 700"> <button>Notify Me</button> </p>把这个新商品提醒组件显示为该商品列表的一部分(子组件)。
Display the new product alert component as part of (a child of) the product list.
打开
product-list.component.html。Open
product-list.component.html.要包含这个新组件,只要像使用 HTML 元素一样使用它的选择器(
app-product-alert)就可以了。To include the new component, use its selector (
app-product-alert) as you would an HTML element.通过属性绑定把当前商品作为输入传递给组件。
Pass the current product as input to the component using property binding.
src/app/product-list/product-list.component.html <button (click)="share()"> Share </button> <app-product-alerts [product]="product"> </app-product-alerts>
新商品提醒组件会从商品列表中获取商品作为输入信息。通过该输入,它会根据商品的价格显示或隐藏 “Notify Me” 按钮。由于 Phone XL 的售价超过了 700 美元,所以该商品上会出现“Notify Me”按钮。
The new product alert component takes a product as input from the product list. With that input, it shows or hides the "Notify Me" button, based on the price of the product. The Phone XL price is over $700, so the "Notify Me" button appears on that product.
要了解如何将数据从父组件传递到子组件、拦截并处理来自父组件的值,以及检测并对输入属性值进行更改的更多信息,请参阅 组件交互一章。
Learn more: See Component Interaction for more information about passing data from a parent to child component, intercepting and acting upon a value from the parent, and detecting and acting on changes to input property values.
输出
Output
“Notify Me” 按钮暂时还没有任何操作。在本节中,你将设置商品提醒组件,以便当用户单击“Notify Me”时,它会向该商品列表组件发出事件。你将在商品列表组件中定义通知行为。
The "Notify Me" button doesn't do anything yet. In this section, you'll set up the product alert component so that it emits an event up to the product list component when the user clicks "Notify Me". You'll define the notification behavior in the product list component.
打开
product-alerts.component.ts。Open
product-alerts.component.ts.从
@angular/core中导入Output和EventEmitter:Import
OutputandEventEmitterfrom@angular/core:src/app/product-alerts/product-alerts.component.ts import { Component } from '@angular/core'; import { Input } from '@angular/core'; import { Output, EventEmitter } from '@angular/core';在组件类中,用
@Output装饰器和一个事件发射器(EventEmitter)实例定义一个名为notify的属性。这可以让商品提醒组件在 notify 属性发生变化时发出事件。In the component class, define a property named
notifywith an@Outputdecorator and an instance of event emitter. This makes it possible for the product alert component to emit an event when the value of the notify property changes.export class ProductAlertsComponent { @Input() product; @Output() notify = new EventEmitter(); }在商品提醒模板(
product-alerts.component.html)中,用事件绑定更新“Notify Me”按钮,以调用notify.emit()方法。In the product alert template (
product-alerts.component.html), update the "Notify Me" button with an event binding to call thenotify.emit()method.src/app/product-alerts/product-alerts.component.html <p *ngIf="product.price > 700"> <button (click)="notify.emit()">Notify Me</button> </p>接下来,定义单击该按钮时应该发生的行为。回想一下,应该由父组件(商品列表组件)采取行动,而不是商品提醒组件。在
product-list.component.ts文件中,定义一个onNotify()方法,类似于share()方法:Next, define the behavior that should happen when the button is clicked. Recall that it's the parent (product list component)—not the product alerts component—that's going to take the action. In the
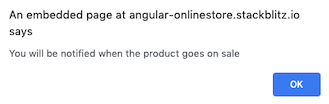
product-list.component.tsfile, define anonNotify()method, similar to theshare()method:src/app/product-list/product-list.component.ts export class ProductListComponent { products = products; share() { window.alert('The product has been shared!'); } onNotify() { window.alert('You will be notified when the product goes on sale'); } }最后,修改商品列表组件以接收商品提醒组件的输出。
Finally, update the product list component to receive output from the product alerts component.
在
product-list.component.html中,把app-product-alerts组件(就是它显示的“Notify Me”按钮)的notify事件绑定到商品列表组件的onNotify()方法。In
product-list.component.html, bind theapp-product-alertscomponent (which is what displays the "Notify Me" button) to theonNotify()method of the product list component.src/app/product-list/product-list.component.html <button (click)="share()"> Share </button> <app-product-alerts [product]="product" (notify)="onNotify()"> </app-product-alerts>试试“Notify Me”按钮:
Try out the "Notify Me" button:
要了解关于从子组件侦听事件、读取子属性或调用子方法以及如何用服务在组件家族中进行双向通信的详细信息,请参阅“组件交互”一章。
Learn more: See Component Interaction for more information about listening for events from child components, reading child properties or invoking child methods, and using a service for bi-directional communication within the family.
下一步
Next steps
恭喜!你已经完成了第一个 Angular 应用!
Congratulations! You've completed your first Angular app!
你有了一个基本的在线商店目录,它带有商品列表,“Share”按钮和“Notify Me”按钮。你已经了解了 Angular 的基础知识:组件和模板语法。你还学习了组件类和模板如何交互,以及组件如何相互通信。
You have a basic online store catalog, with a product list, "Share" button, and "Notify Me" button. You've learned about the foundation of Angular: components and template syntax. You've also learned how the component class and template interact, and how components communicate with each other.
要继续探索 Angular,请选择以下选项之一:
To continue exploring Angular, choose either of the following options:
继续浏览“路由”部分,创建一个商品详情页面,通过单击商品名称,可以访问该页面,该页面有自己的 URL 模式。
Continue to the "Routing" section to create a product details page that can be accessed by clicking a product name and that has its own URL pattern.
跳到“部署”部分,把你的应用转移到本地开发、部署到 Firebase 或你自己的服务器。
Skip ahead to the "Deployment" section to move to local development, or deploy your app to Firebase or your own server.
